Canary Deployment
Facets now supports Argo Rollouts-Canary Deployment for Service resources, enabling incremental rollouts of changes. This strategy allows you to deploy updates to a small subset of your infrastructure initially, validate the changes, and then fully deploy them across your entire infrastructure, thereby reducing the risk associated with new deployments.
Prerequisites
- Ability to modify/override resource JSON.
- Ability to perform Releases.
APPLICATION_DEPLOYMENT_PROMOTEpermission to promote the preview changes.
Setting the Deployment Strategy to Canary
- Navigate to Projects > Blueprint.
- Select the specific Service resource JSON and select Configure from the drop-down.
- Locate the
"strategy": { "type": "RollingUpdate"}parameter and modify it to"strategy": { "type": "Canary"}
{
  "release": {
  	"strategy": {
          "type": "Canary"
    }
  }
}
- Save your changes and perform a Release to enable Canary Deployment for this resource.
Note: When you release artifact and configuration changes for a service with Canary deployment strategy, they will be accessible in a preview state.
Configuring the Canary Strategy
- Understand the Traffic Manager: We support Canary using Argo Rollouts, and we support all the traffic managers supported by Argo Rollouts. In this use case, we will use Istio as our traffic manager.
- Learn About Traffic Splitting: We are using subset-level traffic splitting. To know more about this, refer to the Istio documentation.
Setting up the traffic split
- Configure the service JSON and set up the traffic split.
- Insert the following
"steps"configuration in the"canary_strategy"section of your configuration file. - Configure the
"setWeight"and"pause"parameters.- setWeight: This parameter specifies the percentage of traffic that should be directed to the Canary version of the service.
- pause: This parameter indicates a pause in the rollout process.
"steps": [
   {
     "setWeight": 10
   },
    {
     "pause": {}
   }
 ],
"strategy":{
            "type":"Canary",
            "canary_strategy":{
               "enable_service":false,
               "steps":[
                  {
                     "setWeight":10
                  },
                  {
                     "pause":{

                     }
                  }
               ],
In this example, we only are configuring only one step and pause(wait).
"setWeight": 10refers to 10% of the traffic going to the Canary.- The
pausevalue is empty because it signifies an indefinite pause, allowing for manual intervention to promote the Canary version or make further adjustments before continuing with the rollout.
Configuring the traffic manager (istio)
- Reference the Destination Rule and Virtual Service: Add the following configuration to reference the destination rule and virtual service.
To know more about Destination Rule and Virtual Service, refer to the Istio documentation.- Destination Rule: This defines policies that apply to traffic intended for a service after routing has occurred. These policies determine how requests are handled once they reach the service.
- Virtual Service: This defines how requests to a service are routed within an Istio service mesh. It specifies the routing rules and the service versions (subsets) the traffic should be directed to..
  "traffic_routing": {
    "istio": {
      "destinationRule": {
        "name": "canary-destination",
        "canarySubsetName": "canary",
        "stableSubsetName": "stable"
      },
      "virtualService": {
        "name": "virtualservice-canary",
        "routes": [
          "primary"
        ]
      }
    }
  }
- Create the Destination Rule and the Virtual Service: Define the
destination_ruleand thevirtual_servicein the resource JSON.
  "destination_rule": {
    "apiVersion": "networking.istio.io/v1alpha3",
    "kind": "DestinationRule",
    "metadata": {
      "name": "canary-destination"
    },
    "spec": {
      "host": "canary",
      "subsets": [
        {
          "name": "canary",
          "labels": {
            "app": "example-canary-service"
          }
        },
        {
          "name": "stable",
          "labels": {
            "app": "example-canary-service"
          }
        }
      ]
    }
  },
  "virtual_service": {
    "apiVersion": "networking.istio.io/v1alpha3",
    "kind": "VirtualService",
    "metadata": {
      "name": "virtualservice-canary"
    },
    "spec": {
      "hosts": [
        "example-canary-service.default.svc.cluster.local"
      ],
      "http": [
        {
          "name": "primary",
          "route": [
            {
              "destination": {
                "host": "example-canary-service",
                "subset": "stable"
              },
              "weight": 90
            },
            {
              "destination": {
                "host": "example-canary-service",
                "subset": "canary"
              },
              "weight": 10
            }
          ]
        }
      ]
    }
  }
Note: Make sure the "labels": {"app": "example-canary-service"} matches the name of the service JSON. For a complete overview of the configuration, refer to the sample JSON.
- Save your changes and perform a Release.
Preview
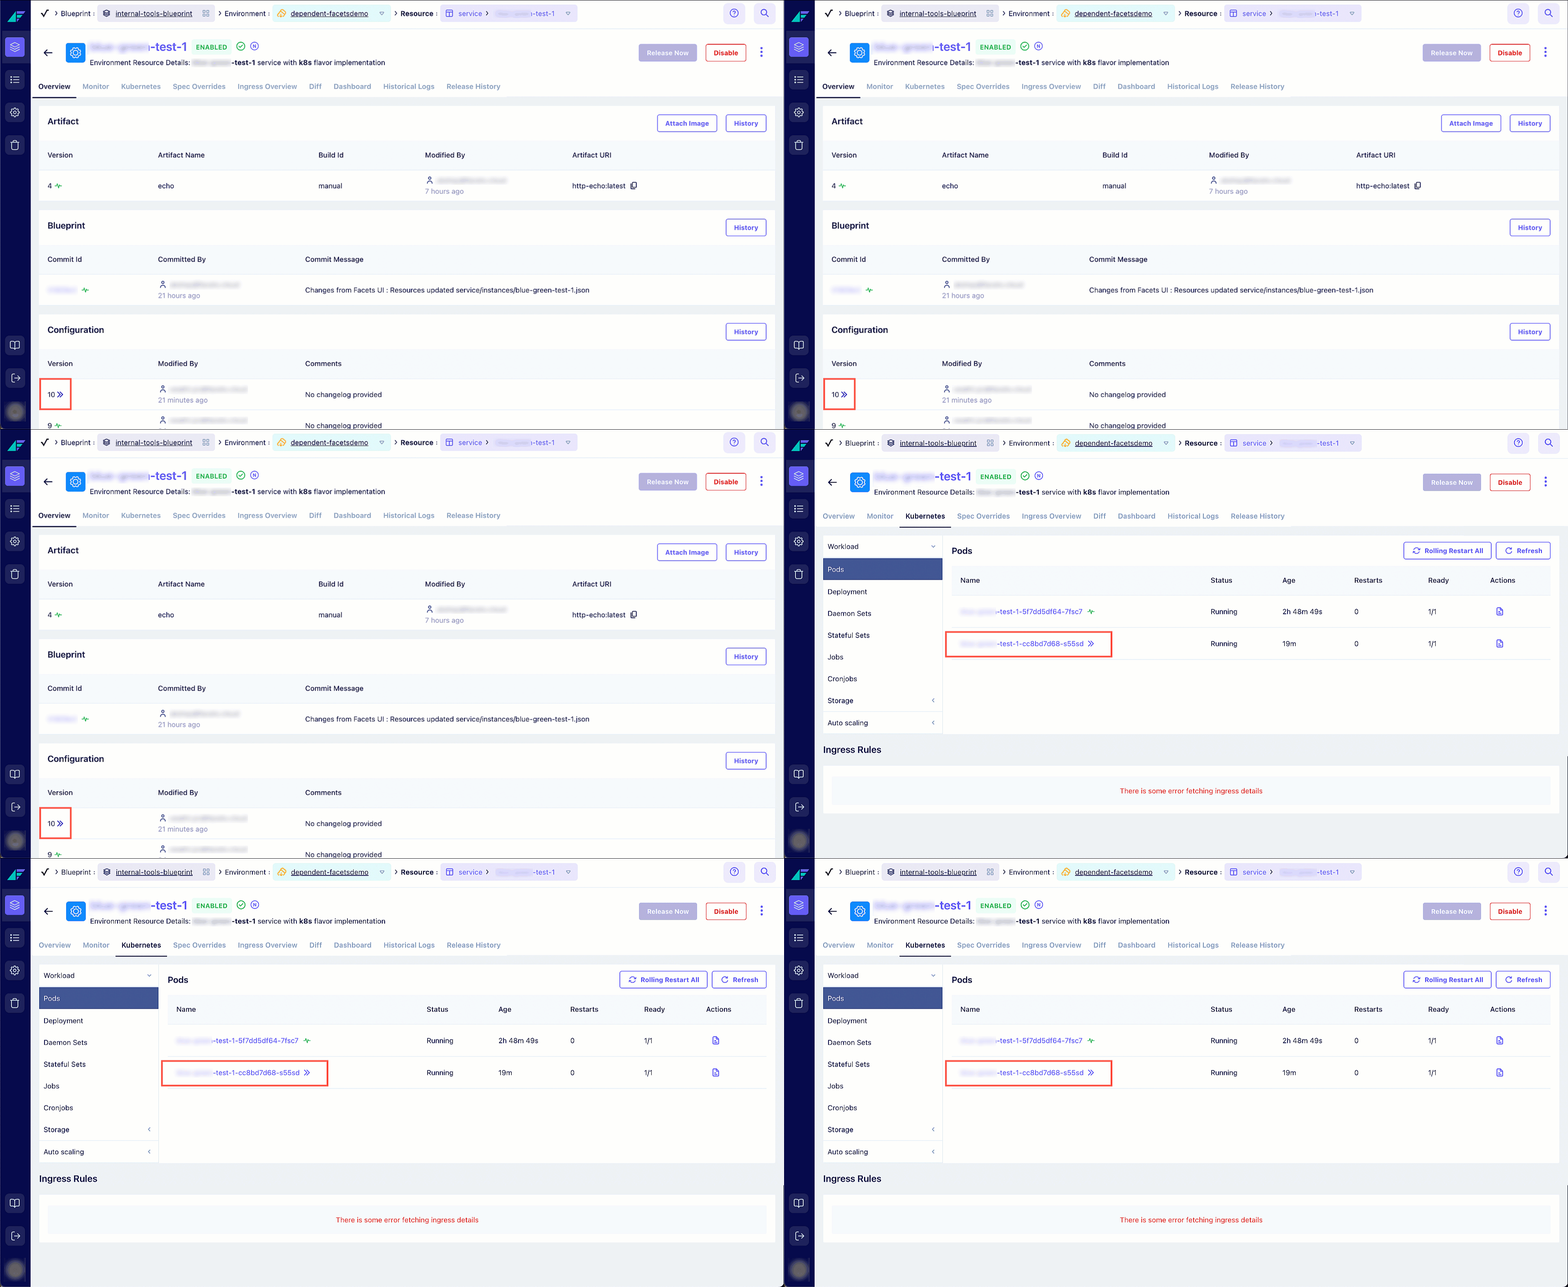
A preview icon will appear in the Artifact table, Blueprint table, Configuration table, and even in Kubernetes pods when there are available changes for a Canary resource.

Click on the image to expand
Promote
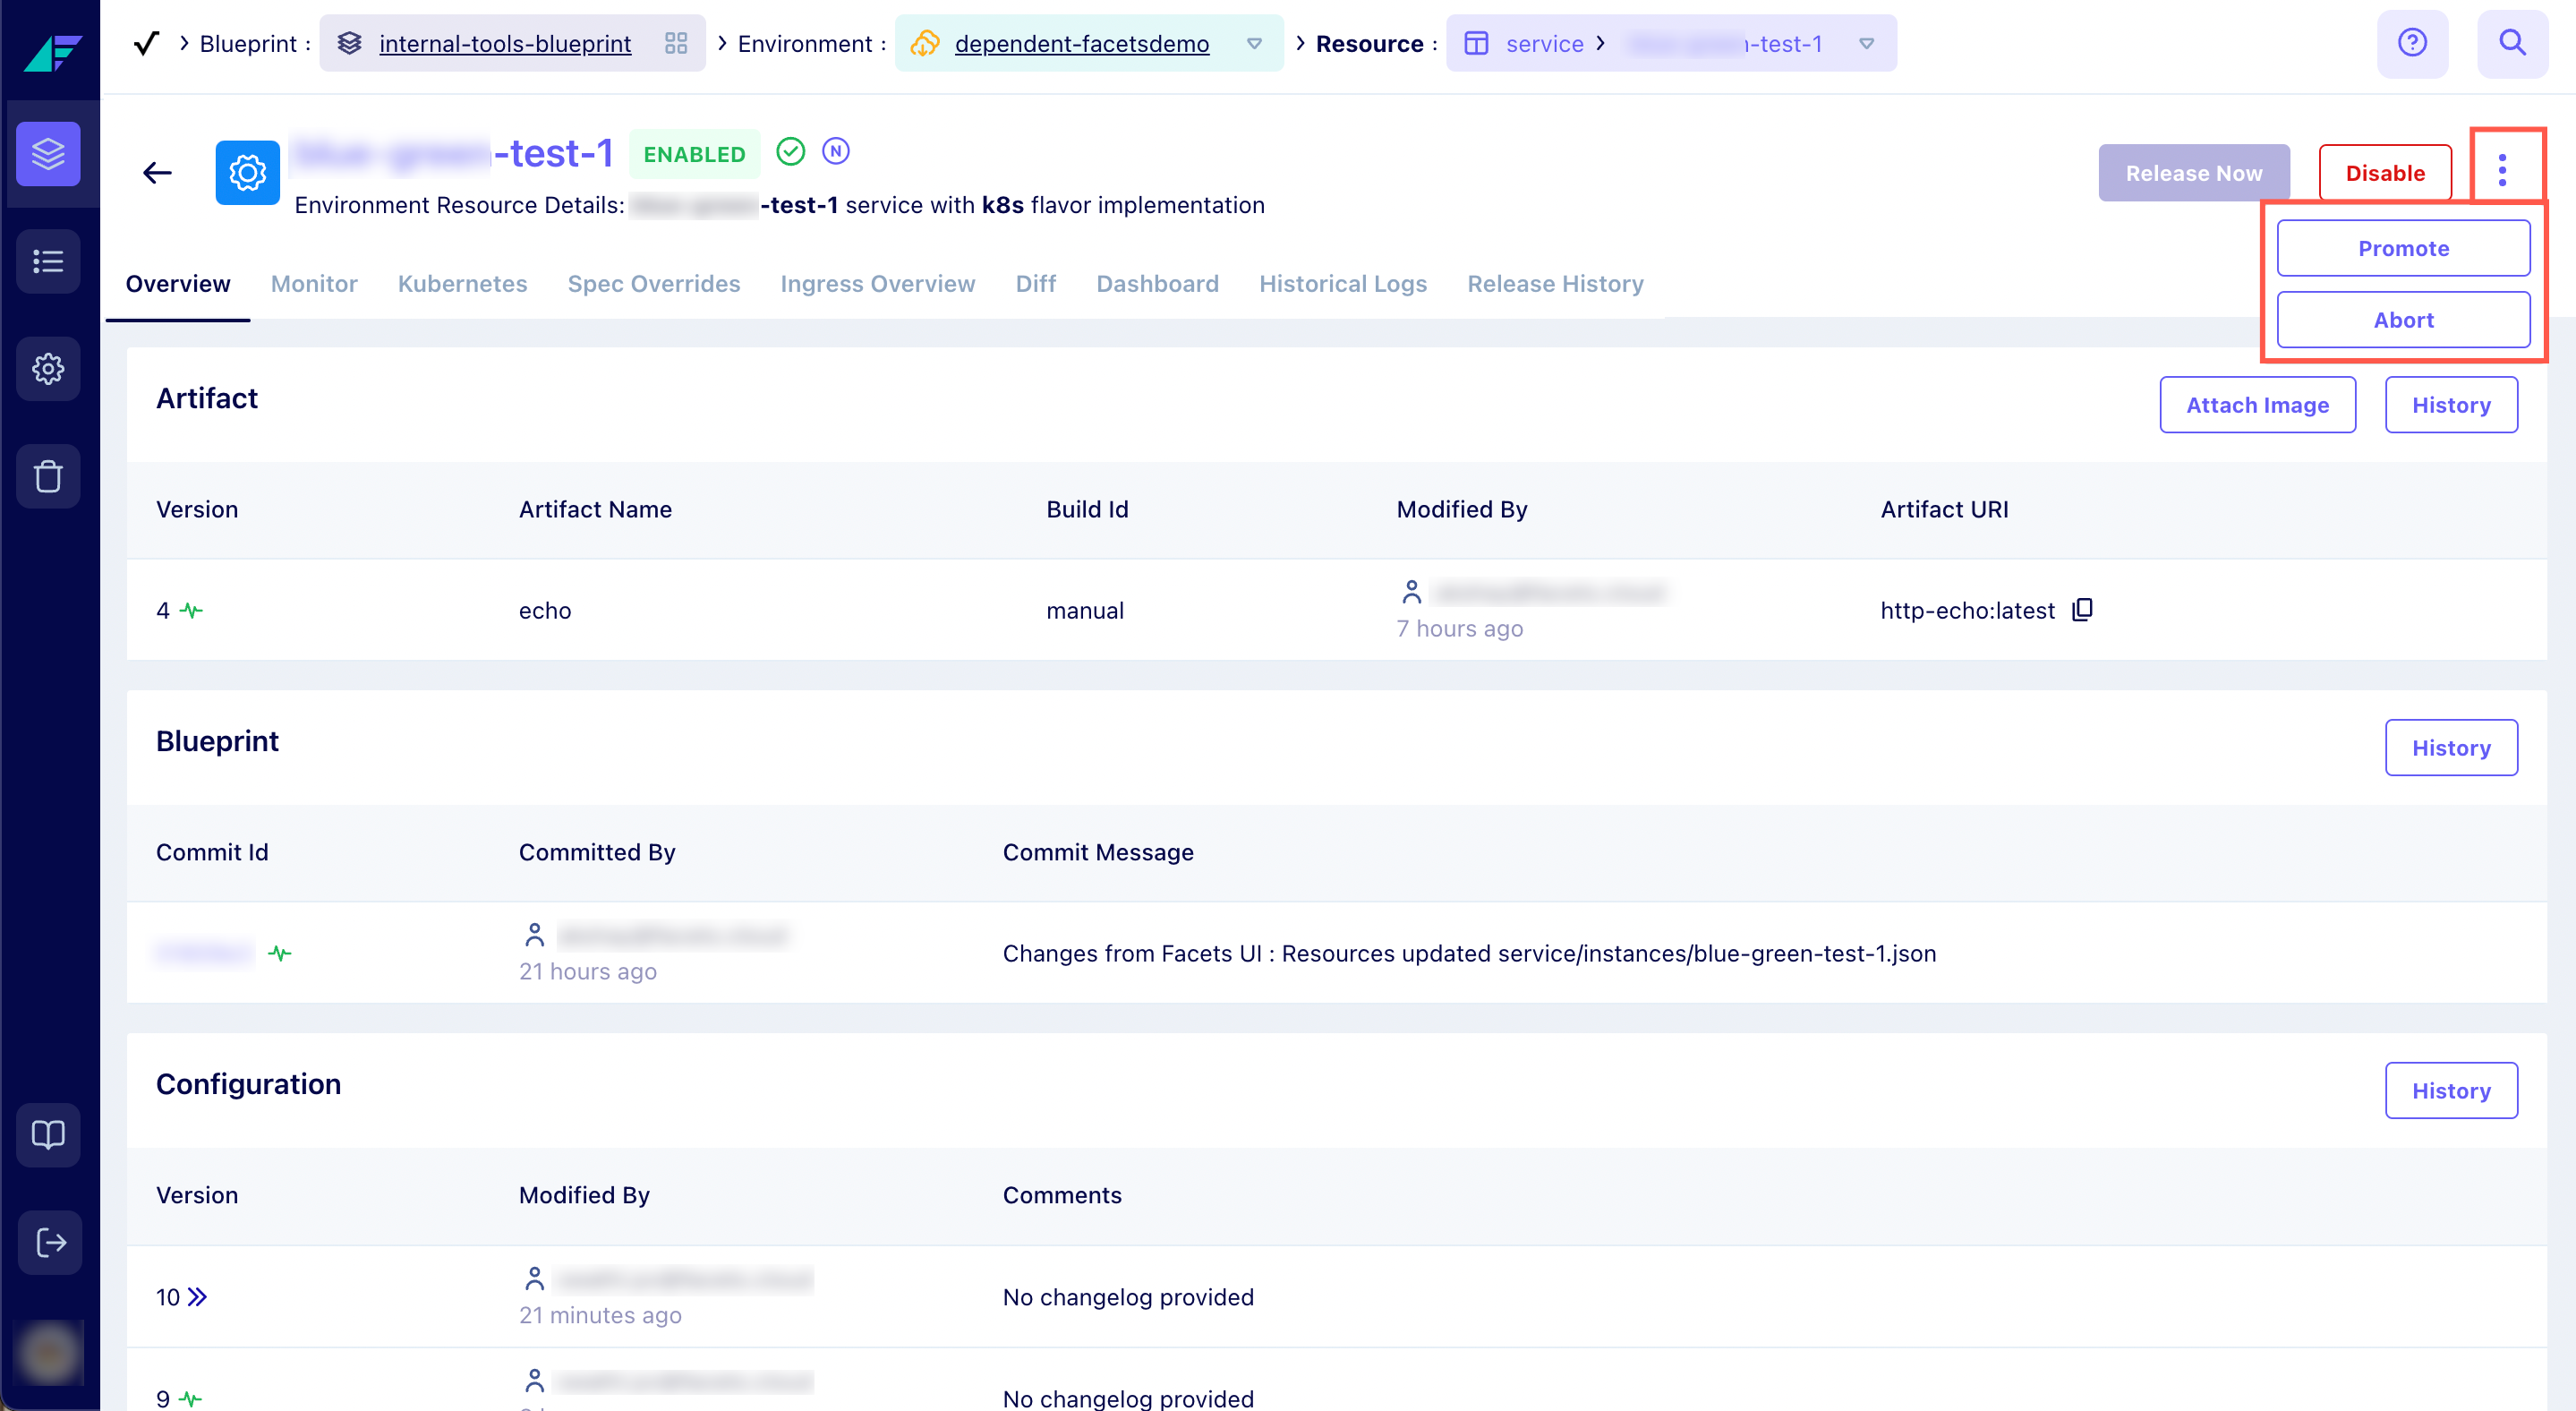
You can choose to promote or abort the preview changes from Resource Overview page.
- Navigate to Resource Overview page and click on the elipsis icon on the top right corner.
- Select either Promote or Abort:
- Promote: This deploys the Canary changes to the production environment, making them live for all users.
- Abort: Rolls back the Canary changes and returns the system to its previous state before the Canary deployment.
Note: This action will revert all pods to the stable version. Any release-triggered changes (Blueprint, Artifact, and configuration) must also be rolled back. Once the rollback is complete, you will need to trigger a release to deploy the updates.
- Now, click Confirm.
This process allows you to control the deployment, ensuring that only stable and verified changes make it to the production environment.

Click on the image to expand
Updated 22 days ago